EG-Connect Linux 无 GUI 部署踩坑实录与原理分析
EG-connect是电信的一个带有GUI图形窗口的客户端,有Windows、Linux、Mac OS 部署方式,但是因为种种原因,公司决定在Linux 22.04 CLL的方式来部署
本文不是重复一份“成功部署指南”,而是围绕真实踩坑过程,解释为什么会失败、失败的底层原理是什么,以及为什么最终方案是“对的”。
场景背景:
- Ubuntu 22.04 CLI / Server
- 无物理显示器、无桌面环境
- EG-Connect 是 强依赖 GUI 的 Qt 客户端
- 目标:SSH 断开后,EG 仍长期稳定工作
一、最早的误判:& / nohup / disown 就能解决后台运行
表现
- 在 SSH 中执行:
/opt/apps/com.egconnect/files/EG-Connect & - SSH 一断,EG 进程直接消失
- 甚至使用
nohup、disown后仍不稳定
原因分析(进程 & 会话模型)
- SSH 登录 ≈ 一个 Session + TTY
- 通过 shell 启动的进程,默认属于该 Session
- SSH 断开时:
- 内核向该 Session 下所有前台/后台进程发送
SIGHUP - GUI 程序(Qt)对 SIGHUP 极其敏感,往往直接退出
- 内核向该 Session 下所有前台/后台进程发送
关键结论
❌
& / nohup / disown不是服务管理工具✅ GUI 程序必须由:
screen / tmux或 systemd(最优)
来托管
二、直接在“无 GUI 环境”启动 EG
表现
- 执行
EG-Connect无窗口、直接报错或无响应 - 日志中出现:
QXcbConnection: Could not connect to displayNo protocol specified
原因分析(Qt + X11 依赖)
- EG 是 Qt GUI 程序:
- 必须连接一个 X Server
- CLI Server 默认:
- ❌ 没有 Xorg
- ❌ 没有 DISPLAY
关键结论
❌ 无头服务器 ≠ 能直接跑 GUI
✅ 必须人为提供一个“假的显示环境”:
- X11 Forward(调试阶段)
- Dummy Xorg(生产阶段)
三、X11 转发能跑,但一断 SSH 就挂
表现
- 使用:
ssh -X user@host xclock正常- EG 能启动、能连网
- SSH 一断:
- EG 立刻退出
原因分析(X11 Forward 的本质)
-
ssh -X的 DISPLAY 实际是:DISPLAY=localhost:10.0 - X Server 在本地机器上
- SSH 断开:
- X11 隧道关闭
- 服务端程序失去 DISPLAY → 直接退出
关键结论
❌ X11 Forward 只能用于验证程序能否启动
✅ 不能作为长期运行方案
四、第一次使用 Xorg,但忽略了 XDG_RUNTIME_DIR
表现
- Xorg 已启动
- EG 启动后:
- 界面不完整
- 网络状态异常
- 有时能连,有时不能
原因分析(Qt / Wayland / Runtime 目录)
- Ubuntu 22.04 默认:
- systemd-logind + Wayland 兼容逻辑
- Qt 程序启动时会依赖:
XDG_RUNTIME_DIR - 该目录用于:
- socket
- shm
- session 状态
如果:
- 目录不存在
- 权限不对
Qt 行为会 不确定(最难排查的那种问题)
关键结论
❌ 不设置
XDG_RUNTIME_DIR会导致“玄学问题”✅ 必须显式创建并指定:
/run/eg-runtime 或 /tmp/runtime-<user>
五、进程明明在,但网络“有时通有时不通”
表现
ps -ef | grep EG:进程存在ping 8.8.8.8:正常curl https://google.com:- 有时 200
- 有时卡住
原因分析(EG 的网络工作模式)
- EG 并不是简单 SOCKS 代理
- 它会:
- 创建虚拟网卡 / tun 设备
- 动态修改路由或 DNS
- GUI 登录状态 ≠ 网络已完全 ready
此外:
- EG 客户端有 5–10 秒缓存期
- 断连瞬间测试网络,会产生误判
关键结论
❌ 单次 curl 不具备参考意义
✅ 必须:
- 持续测试
- 结合进程状态 + 返回码
这也是后来写 测试脚本 的原因
六、为什么最终选择 systemd + Dummy Xorg
systemd 解决了什么
- 进程父 PID = 1
- 与 SSH 会话完全解耦
- 支持:
- 自动拉起
- 崩溃重启
- 开机自启
Dummy Xorg 解决了什么
- 提供稳定 DISPLAY
- 不依赖任何 SSH 会话
- 不依赖物理显卡 / 显示器
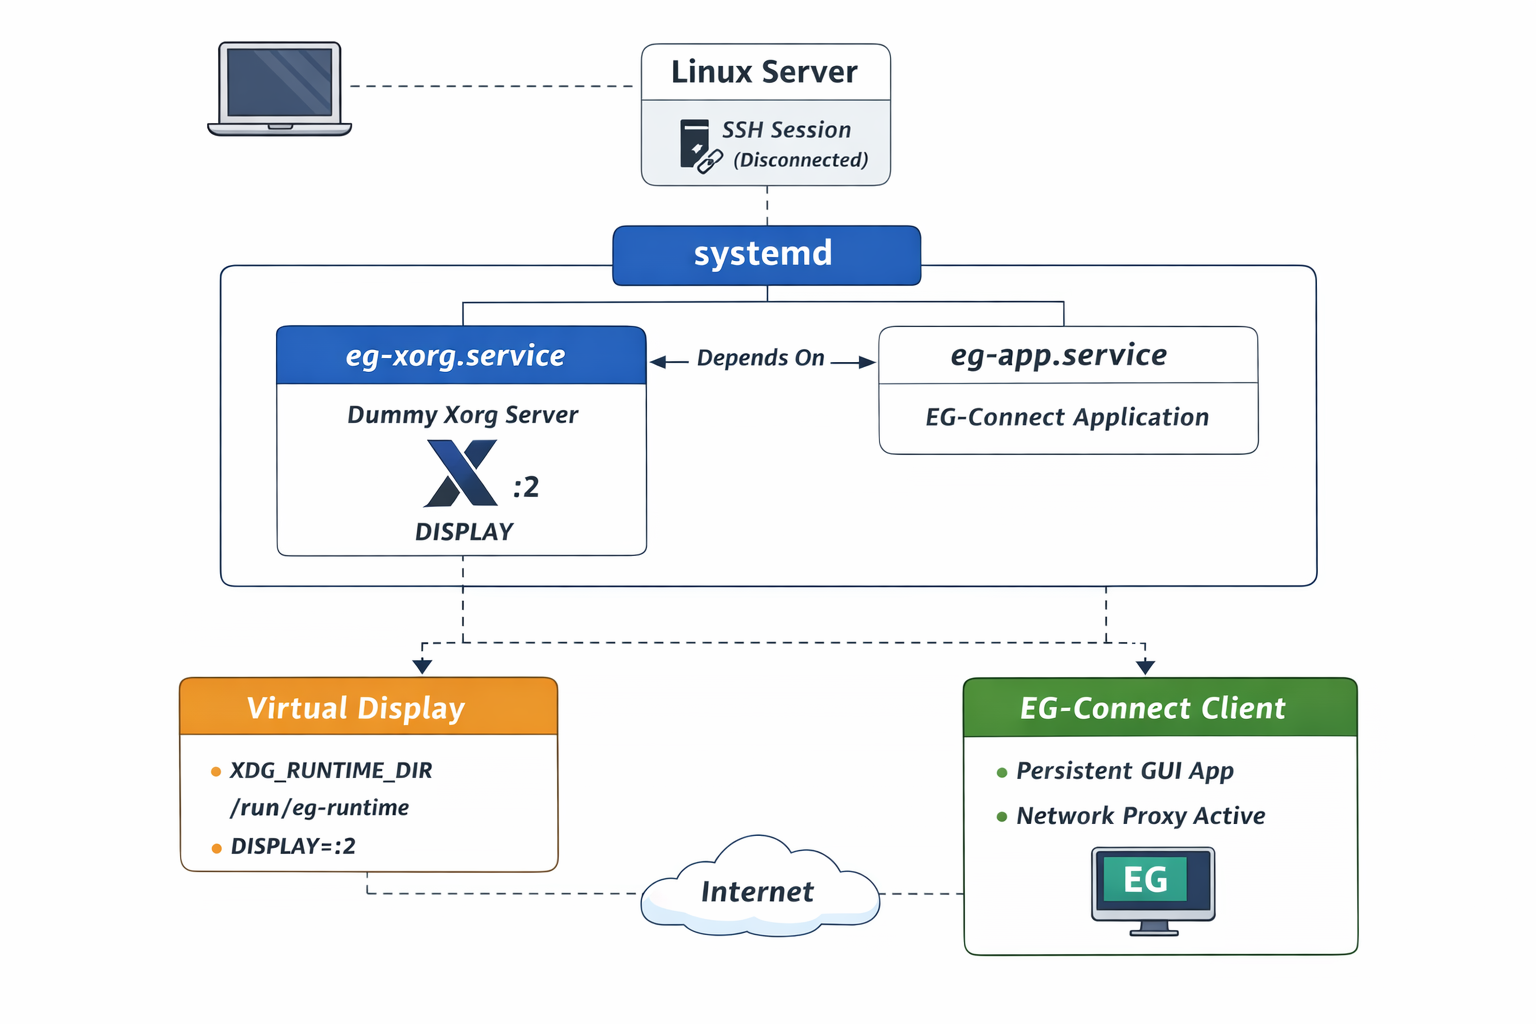
最终模型
systemd
 ├─ eg-xorg.service   (虚拟显示层)
 └─ eg-app.service    (EG 客户端)
这是一个:
用服务器思维,托管 GUI 程序的标准解法
八、经验总结
- GUI 程序 ≠ CLI 程序
- 能启动 ≠ 能长期稳定运行
- 网络偶发异常,往往是“运行环境不完整”
- systemd 是 Linux 服务治理的终点方案
真正的坑,不在命令本身, 而在是否理解: 进程、会话、显示、运行时目录之间的关系
九、最优部署方式
方式一
#1.更新并下载相关组件

jjt@jjt:~$ sudo apt update
jjt@jjt:~$ sudo apt install -y \
    screen \
    xorg \
    libxcb1-dev \
    libxcb-xinerama0-dev \
    libxcb-icccm4-dev \
    libxcb-image0-dev \
    libxcb-keysyms1-dev \
    libxcb-randr0-dev \
    libxcb-render-util0-dev \
    libxcb-shape0-dev \
    libxcb-xkb-dev \
    libqt5gui5 \
    qt5-qmake \
    libgtk2.0-0 \
    libx11-xcb1 \
    libx11-dev \
    libxrender-dev \
    libxtst-dev \
    libqt5core5a \
    xauth \
    x11-apps

#2.将EG安装包上传到/tmp目录后,安装EG客户端

jjt@jjt:~$ sudo apt install /tmp/com.egconnect_6.0.16_amd64.deb

#3.使用X11转发的方式重新登录
jjt@jjt:~$ ssh -X <用户名>@<ip>

#4.测试环境是否部署成功,如果成功会弹出一个时钟的GUI窗口
jjt@jjt:~$ xclock

#5.后台运行EG,并配置ID,账号密码,勾选记住密码和自动登录
jjt@jjt:~$ /opt/apps/com.egconnect/files/EG-Connect &
必须确保勾选记住密码和自动登录这两个选项
测试:
- 确保EG的客户端显示正常连接
-
使用 sudo ps -ef grep EG显示有EG的进程 - 使用curl -I https://www.google.com返回200代码
jjt@jjt:~$ sudo ps -ef |grep EG
jjt        11554   11553  5 11:02 pts/7    00:00:00 /opt/apps/com.egconnect/files/EG-Connect
jjt        11768   10598  0 11:02 pts/5    00:00:00 grep --color=auto EG

jjt@jjt:~$ curl -I https://www.google.com
HTTP/2 200  ##返回200表示成功访问
结束测试需要使用kill命令结束EG进程
jjt@jjt:~$ ps -ef |grep EG
jjt        11553       1  0 11:02 ?        00:00:00 SCREEN -dmS egconnect bash -c export DISPLAY=:2;  export XDG_RUNTIME_DIR=/tmp/runtime                                                                     -root; /opt/apps/com.egconnect/files/EG-Connect
jjt        11554   11553  5 11:02 pts/7    00:00:00 /opt/apps/com.egconnect/files/EG-Connect
jjt        11768   10598  0 11:02 pts/5    00:00:00 grep --color=auto EG
jjt@jjt:~$ sudo kill <进程id>
SSH会话环境测试正常完毕后,再使用xorg的方式启动EG
#6.创建 runtime 目录(避免 Qt / Wayland 问题)
jjt@jjt:~$ sudo mkdir -p /tmp/runtime-<用户名>
jjt@jjt:~$ sudo chown jjt:jjt /tmp/runtime-<用户名>
jjt@jjt:~$ chmod 700 /tmp/runtime-<用户名>


#7.启动 dummy Xorg (虚拟显示环境)
jjt@jjt:~$ sudo screen -dmS dummyx Xorg :2 -config /etc/X11/xorg.conf.d/10-dummy.conf
[sudo] password for jjt:

# 8. 在后台启动 EG-Connect 并指定 Xorg 显示和运行环境
jjt@jjt:~$ screen -dmS egconnect bash -c 'export DISPLAY=:2; export XDG_RUNTIME_DIR=/tmp/runtime-root; /opt/apps/com.egconnect/files/EG-Connect'

#9. 关闭ssh会话窗口,测试代理环境是否正常
jjt@jjt:~$ ps -ef |grep EG
jjt        11553       1  0 11:02 ?        00:00:00 SCREEN -dmS egconnect bash -c export DISPLAY=:2;  export XDG_RUNTIME_DIR=/tmp/runtime                                                                     -root; /opt/apps/com.egconnect/files/EG-Connect
jjt        11554   11553  5 11:02 pts/7    00:00:00 /opt/apps/com.egconnect/files/EG-Connect
jjt        11768   10598  0 11:02 pts/5    00:00:00 grep --color=auto EG

jjt@jjt:~$ curl -I https://www.google.com
HTTP/2 200  ##返回200表示成功访问


---这个时候可以关闭当前SSH会话再重新建立一个新的SSH会话再测试一遍,确保进程不随SSH会话断开而关闭---

---EG客户端即使断开也会有5-10秒的缓存,可以多测一段时间,主要看进程是否保留和curl的返回码是否为200---
#10. 关闭ssh会话窗口,测试代理环境是否正常
jjt@jjt:~$ ps -ef |grep EG
jjt        11553       1  0 11:02 ?        00:00:00 SCREEN -dmS egconnect bash -c export DISPLAY=:2;  export XDG_RUNTIME_DIR=/tmp/runtime                                                                     -root; /opt/apps/com.egconnect/files/EG-Connect
jjt        11554   11553  5 11:02 pts/7    00:00:00 /opt/apps/com.egconnect/files/EG-Connect
jjt        11768   10598  0 11:02 pts/5    00:00:00 grep --color=auto EG

jjt@jjt:~$ curl -I https://www.google.com
HTTP/2 200  ##返回200表示成功访问
使用脚本测试网络速率和稳定性
jjt@jjt:~$ ps -ef |grep EG
jjt        11553       1  0 11:02 ?        00:00:00 SCREEN -dmS egconnect bash -c export DISPLAY=:2;  export XDG_RUNTIME_DIR=/tmp/runtime-root; /opt/apps/com.egconnect/files/EG-Connect
jjt        11554   11553  0 11:02 pts/7    00:00:03 /opt/apps/com.egconnect/files/EG-Connect
jjt        13714   13537  0 11:17 pts/8    00:00:00 grep --color=auto EG

jjt@jjt:~$ curl -I https://www.google.com
HTTP/2 200  ##返回200表示成功访问


jjt@jjt:~$ ping 8.8.8.8
PING 8.8.8.8 (8.8.8.8) 56(84) bytes of data.
64 bytes from 8.8.8.8: icmp_seq=1 ttl=115 time=78.4 ms
64 bytes from 8.8.8.8: icmp_seq=2 ttl=115 time=78.7 ms
^C
--- 8.8.8.8 ping statistics ---
2 packets transmitted, 2 received, 0% packet loss, time 1000ms
rtt min/avg/max/mdev = 78.448/78.560/78.673/0.112 ms

---确保处于代理环境时运行测试脚本---

# 上传或编写代码
jjt@lavm-9x9lehiak7:~$ vi test.sh
# 添加执行权限
jjt@lavm-9x9lehiak7:~$ chmod +x test.sh
# 运行脚本
jjt@lavm-9x9lehiak7:~$ ./test.sh
2026-01-08 11:29:29 | Ping Avg: 80.784 ms | Loss: 0% | Download: 245.42 KB/s | Process 'EG-Connect' running | Google Status: OK
2026-01-08 11:29:45 | Ping Avg: 78.823 ms | Loss: 0% | Download: 85.46 KB/s | Process 'EG-Connect' running | Google Status: OK
2026-01-08 11:30:10 | Ping Avg: 78.870 ms | Loss: 0% | Download: 133.66 KB/s | Process 'EG-Connect' running | Google Status: OK
2026-01-08 11:30:30 | Ping Avg: 78.239 ms | Loss: 0% | Download: 216.11 KB/s | Process 'EG-Connect' running | Google Status: OK
2026-01-08 11:30:47 | Ping Avg: 78.926 ms | Loss: 0% | Download: 121.80 KB/s | Process 'EG-Connect' running | Google Status: OK
2026-01-08 11:31:08 | Ping Avg: 78.158 ms | Loss: 0% | Download: 108.45 KB/s | Process 'EG-Connect' running | Google Status: OK
2026-01-08 11:31:30 | Ping Avg: 78.896 ms | Loss: 0% | Download: 116.06 KB/s | Process 'EG-Connect' running | Google Status: OK
2026-01-08 11:31:51 | Ping Avg: 79.382 ms | Loss: 0% | Download: 77.52 KB/s | Process 'EG-Connect' running | Google Status: OK
2026-01-08 11:32:17 | Ping Avg: 78.647 ms | Loss: 0% | Download: 130.29 KB/s | Process 'EG-Connect' running | Google Status: OK
2026-01-08 11:32:37 | Ping Avg: 78.461 ms | Loss: 0% | Download: 131.76 KB/s | Process 'EG-Connect' running | Google Status: OK
2026-01-08 11:32:58 | Ping Avg: 79.185 ms | Loss: 0% | Download: 108.60 KB/s | Process 'EG-Connect' running | Google Status: OK
方式二(推荐)
使用systemed方式配置管理EG
架构图
#1.更新并下载相关组件

jjt@jjt:~$ sudo apt update
jjt@jjt:~$ sudo apt install -y \
    screen \
    xorg \
    libxcb1-dev \
    libxcb-xinerama0-dev \
    libxcb-icccm4-dev \
    libxcb-image0-dev \
    libxcb-keysyms1-dev \
    libxcb-randr0-dev \
    libxcb-render-util0-dev \
    libxcb-shape0-dev \
    libxcb-xkb-dev \
    libqt5gui5 \
    qt5-qmake \
    libgtk2.0-0 \
    libx11-xcb1 \
    libx11-dev \
    libxrender-dev \
    libxtst-dev \
    libqt5core5a \
    xauth \
    x11-apps

#2.将EG安装包上传到/tmp目录后,安装EG客户端

jjt@jjt:~$ sudo apt install /tmp/com.egconnect_6.0.16_amd64.deb

#3.使用X11转发的方式重新登录
jjt@jjt:~$ ssh -X ubuntu@<ip>

#4.测试环境是否部署成功,如果成功会弹出一个时钟的GUI窗口
jjt@jjt:~$ xclock

#5.后台运行EG,并配置ID,账号密码,勾选记住密码和自动登录
jjt@jjt:~$ /opt/apps/com.egconnect/files/EG-Connect &
必须确保勾选记住密码和自动登录这两个选项
测试:
- 确保EG的客户端显示正常连接
-
使用 sudo ps -ef grep EG显示有EG的进程 - 使用curl -I https://www.google.com返回200代码
jjt@jjt:~$ sudo ps -ef |grep EG
jjt        11554   11553  5 11:02 pts/7    00:00:00 /opt/apps/com.egconnect/files/EG-Connect
jjt        11768   10598  0 11:02 pts/5    00:00:00 grep --color=auto EG

jjt@jjt:~$ curl -I https://www.google.com
HTTP/2 200  ##返回200表示成功访问
结束测试需要使用kill命令结束EG进程
jjt@jjt:~$ ps -ef |grep EG
jjt        11553       1  0 11:02 ?        00:00:00 SCREEN -dmS egconnect bash -c export DISPLAY=:2;  export XDG_RUNTIME_DIR=/tmp/runtime                                                                     -root; /opt/apps/com.egconnect/files/EG-Connect
jjt        11554   11553  5 11:02 pts/7    00:00:00 /opt/apps/com.egconnect/files/EG-Connect
jjt        11768   10598  0 11:02 pts/5    00:00:00 grep --color=auto EG
jjt@jjt:~$ sudo kill <进程id>
#6. 创建 /run/eg-runtime 目录:
sudo mkdir -p /run/eg-runtime
sudo chown ubuntu:ubuntu /run/eg-runtime
sudo chmod 0700 /run/eg-runtime


#7. 配置 eg-xorg.service (虚拟显示层)
sudo vim /etc/systemd/system/eg-xorg.service
写入以下内容

[Unit]
Description=Dummy Xorg Server for EG
After=network.target

[Service]
Type=simple
User=root

ExecStart=/usr/bin/Xorg :2 -config /etc/X11/xorg.conf.d/10-dummy.conf -noreset -verbose 3
Restart=always
RestartSec=5

[Install]
WantedBy=multi-user.target


#8. 配置 eg-app.service (应用层)
sudo vim /etc/systemd/system/eg-app.service

写入以下内容

[Unit]
Description=EG Connect Client UI
Requires=eg-xorg.service
After=eg-xorg.service network.target

[Service]
Type=simple

User=jjt

RuntimeDirectory=eg-runtime
RuntimeDirectoryMode=0700

Environment="DISPLAY=:2"
Environment=XDG_RUNTIME_DIR=/run/eg-runtime

ExecStart=/opt/apps/com.egconnect/files/EG-Connect

Restart=always
RestartSec=10

[Install]
WantedBy=multi-user.target


# 9. 重载配置
sudo systemctl daemon-reload

# 10. 设置开机自启
sudo systemctl enable eg-xorg
sudo systemctl enable eg-app

# 启动eg (只需要启动 eg-app,它会自动把 eg-xorg 拉起来)
sudo systemctl start eg-app
# 关闭eg
sudo systemctl stop eg-app
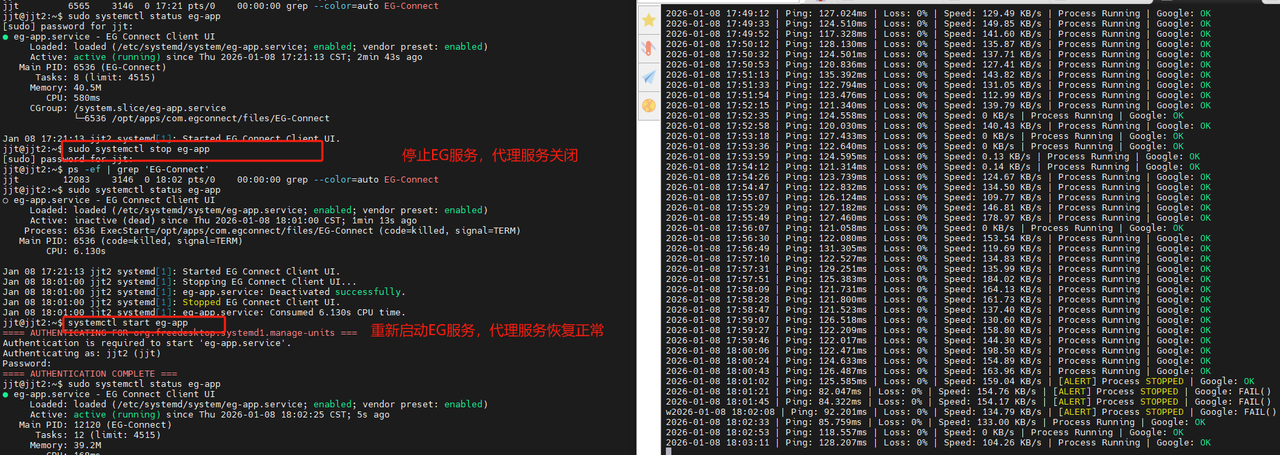
部分脚本日志
=== 网络稳定性测试脚本启动于 2026-01-12 14:30:55 ===
2026-01-12 14:30:55 | Ping: 76.038ms | Loss: 0% | Speed: 202.57 KB/s | Process Running | Google: OK
2026-01-12 14:31:13 | Ping: 76.405ms | Loss: 0% | Speed: 0 KB/s | Process Running | Google: OK
2026-01-12 14:31:36 | Ping: 76.521ms | Loss: 0% | Speed: 0 KB/s | Process Running | Google: OK
2026-01-12 14:31:58 | Ping: 76.001ms | Loss: 0% | Speed: 0 KB/s | Process Running | Google: OK
2026-01-12 14:32:21 | Ping: 77.175ms | Loss: 0% | Speed: 0 KB/s | Process Running | Google: OK


---

2026-01-13 09:45:37 | Ping: 77.723ms | Loss: 0% | Speed: 251.21 KB/s | Process Running | Google: OK
2026-01-13 09:45:54 | Ping: 78.437ms | Loss: 0% | Speed: 251.94 KB/s | Process Running | Google: OK
2026-01-13 09:46:10 | Ping: 78.104ms | Loss: 0% | Speed: 202.34 KB/s | Process Running | Google: OK
2026-01-13 09:46:28 | Ping: 80.180ms | Loss: 0% | Speed: 157.49 KB/s | Process Running | Google: OK
2026-01-13 09:46:47 | Ping: 79.738ms | Loss: 0% | Speed: 219.77 KB/s | Process Running | Google: OK
2026-01-13 09:47:04 | Ping: 81.081ms | Loss: 0% | Speed: 238.85 KB/s | Process Running | Google: OK
脚本下载 test.sh